

Lots of people are wondering how to write project proposal (in this case we will talk about project proposals for various social initiatives). Before we start discussing all dos & don’ts, let us be honest – it is not a simple thing to do.
Our association has written hundreds of various project proposals, yet we have been struggling and feeling demotivated for a long time. Sounds familiar? Well, you are not the only one. But wait for the good news. Our troubles went from very big to very manageable when we have understood one simple thing about proposals. In fact, it has:
- Made our projects more impactful
- Increased the chance of project approval almost twofold
- Made project proposal writing a happier, more creative & interesting process
- Saved us time & resources
Too good to be true? Read on and you will learn all about it. Reading time: 8 minutes
Not a reader? You can also find our free online course on Udemy (39 minutes of video). It’s covering the same project proposal writing strategies as here.
- If you are here to simply improve your proposal writing style, we would recommend another blog post of ours: 10 Top Tips to Rock Project Writing
- 🤖 ChatGPT: our latest blog uncovers how ChatGPT can transform your writing process (recommended after the project planning phase).
Secret to Writing Great Project Proposals
To be brief: it all boils down to proper planning & project visualisation before the actual proposal writing starts. Not sure what I mean? Look at the summary of how we go about this:
- Framing the project problem (i.e. what do we want to solve)
- Learning & researching about the problem
- Laying the project’s logical framework & sketching out ideas for activities (i.e. what could be the solutions)
- Visualising the proposal (A to Z)
- Getting relevant feedback & making revisions
- Finalising the project plan & only then starting to write

6 steps proposal planning journey to be taken to rock the project writing later
This may seem like a lot to do before proposal writing. Yet, these prior steps will save you time, nerves, and motivation when the writing process starts. So much so, that in the end you will end up spending less time in total.
In other words, the project plan will have the key details, and you will just need to elaborate on those when writing. No more making stuff up as you go.
1. Framing the Project Problem
This is straightforward. Every project proposal needs to address a certain problem or a few of them. Thus, to write a good project you need to know & jot down your problem(s).
In fact, Albert Einstein once said the following (which we think applies quite well to our case):
If I had an hour to solve a problem and my life depended on the solution, I would spend the first fifty-five minutes determining the proper question to ask, for once I know the proper question, I could solve the problem in less than five minutes.
How to formulate a problem?
A well-formulated problem needs to have a clear context (in 1 sentence), which may answer the following:
- When & where the problem arises?
- For whom is this problem acute?
- Has anyone tried to solve it? How?
Also, you need to show why is it relevant (in 2 sentences), which may require answering the following:
- What will happen if the problem is not solved?
- If it is not solved, who/what will be harmed?
- Is this problem seen in other contexts?
- Why does this problem need to be solved?
Example: [CONTEXT] Low voter turnout has been shown to have negative associations with social cohesion and civic engagement and is becoming an increasing concern in the European Union (EU). [RELEVANCE] When some citizens lack political representation, they are likely to become more excluded over time, leading to an erosion of trust in democracy. Addressing this problem will have practical benefits for the EU and contribute to understanding of this widespread phenomenon.
It might be possible to formulate the problem right away (if you are an expert in the field). Yet, in most cases to completely understand it (from various perspectives / contexts), you will need to move to the 2nd step of our project planning journey.
2. Getting to know the project’s problem
Firstly, you need to be sure that the problem is real (and not perceived). Hence, the key of your research should be to find evidence that the issue exists. Below you can find the main guiding principles on how to do it right.
you need to be sure that the problem is real (and not perceived)
- Do not assume – find out instead
- You need evidence instead of beliefs
- Avoid confirmation bias – actively look for evidence that may counter your beliefs
- Do not confuse: my needs (or my organisation’s needs, my partners’ needs) and the target group’s needs
Is the problem you want to tackle real?
Research methods
- Checking quantitative data (e.g. Eurobarometer, Eurostat, OECD datasets for countries/regions)
- Checking literature / good examples (e.g. searching for articles / initiatives / organisations or experts working on the problem)
- Carrying out surveys (e.g. asking your Facebook friends / followers to fill-in a questionnaire on the issue)
- Making interviews (e.g. with people affected by the problem)
Note: it might be too much to do all the above. Remember we do not want to demotivate you. Better choose what is the most suitable in your case (especially if you are lacking time and/or resources).
If you’re addressing a social issue (e.g. integration of refugees): surveys and/or interviews are probably the surest ways to confirm that the issue is real or perceived. And, with today’s freely available tools, such as Google Forms, they are not that difficult/time-consuming to carry out.
Goal of this phase: first and foremost it should be about seeing the facts. The interpretation of those facts comes later.
Interpreting the gathered data and facts
Once you have collected enough facts and confirmed that the problem is real, you should be able to move on to the next phase – interpretation. This entails:
- Formulating your problem (see above)
- Creating a problem tree
- Creating a stakeholder map
What is a problem tree? It is a method to see the problem from all angles. First, you start with its core (i.e. identify your problem). Second, you look at the effect of this problem. And, lastly, you dig into its root causes. The image below illustrates it:
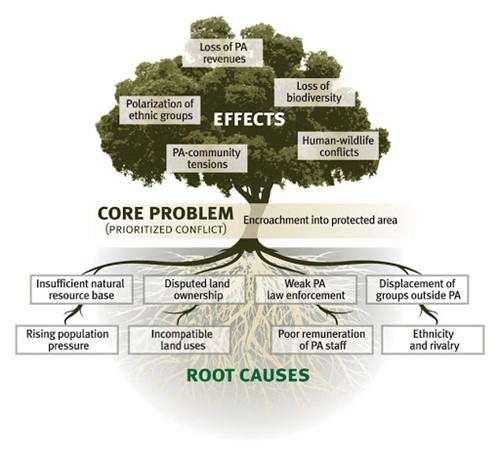
Project’s problem tree with the core problem, effects and root causes identified
What is a stakeholder map? In short, it is a visual representation of all the groups / people involved in your issue. It also requires showing how these different stakeholders are connected between each other (e.g. the elderly USES social services; while the government FUNDS those social services). Look at an example below:

A sample stakeholder map
Stakeholder map may help to understand that complex web of relationships around the problem. This, in turn, might allow you to identify what groups / people to:
- Keep informed (or address their concerns) about the project to get their support in tackling the problem
- Involve into the project’s activities to address the problem properly
Once you fully understand your problem (i.e. the context, the groups involved, etc.), it is time to move to the next step in your journey.
3. Making a logical framework for your project proposal
We will assume that by this point you (will) have a few ideas about specific activities, which could be useful / cool to tackle your chosen problem.
However, before you start jotting those activities down, we suggest starting your brainstorming process from the impact you want to have with your project. In other words, what is the fundamental change you want to make (i.e. the goal of your project)? That is because everything else in the proposal (including the activities) should be based on that.
everything else in the proposal should be based on the desired impact
Example: The impact that our project seeks is equal access to justice for all in the US.
Once you know what impact you would like to reach, you can then think about what outcome(s) will be required for that. Outcome is the expected impact your project will have (i.e. your contribution to the desired change).
Example: The wanted outcome of the project is more poor defendants being represented in US courts. This is a condition to reach equal justice for all (i.e. the fundamental change we want to achieve with our project)
Note: there might be more than one outcome necessary for the desired impact to materialise.
🧠 SMART outcomes:
It’s recommended to make your outcomes SMART – specific, measurable, achievable, relevant & time-bound. For example: the wanted outcome of the project is 10% / x% / 100 / x more poor defendants being represented in US courts by 202x (vs. base year).
Why? Having SMART outcome(s) will: 1) make writing and understanding your project proposal easier; 2) likely score extra evaluation points; 3) make it easier to implement and track the project’s progress (once approved).
Knowing what outcome(s) is needed will help you realise what would be the necessary output(s) (to lead towards those outcomes). Outputs are the results / products of your project. Once again, there might be more than one output for any single outcome.
Example: more lawyers trained is the project’s output required to reach the outcome of more poor defendants being represented.
Note: outputs should also be SMART. E.g., the project’s output is 10% / x% / 100 / x more lawyers in US trained by 202x (vs. base year).
Only at this point you should start asking what action(s) / activitie(s) you must take to produce that output(s) (result / product). Here you can go all out with brainstorming (to create as many ideas as possible) and then choose the most suitable ones. Need ideas for brainstorming techniques? Try these effective brainstorming methods.
Example: to train more lawyers the project will develop course materials and curriculum for legal education.
Logical framework explained
We know it might be a lot of complicated information to digest; thus, we will give you an unifying example:
- Problem: mortality rates are high due to no access to clean water for food & drinking
- Activity: we build a well
- Output: access to clean water is provided to village X (by year 202x)
- Expected outcome: x% of families in village X use clean water to drink and cook which makes them feel better (by 202x)
- Desired impact: mortality is stopped
All this constitutes a logical framework of your project. However, building it is a reverse process. This means that your proposal’s logic should follow the following order:
- what it is the main goal (impact) of your project
- which outcomes are necessary to reach that goal
- what outputs/results/products will help to achieve those objectives
- what activities will produce those outputs/results
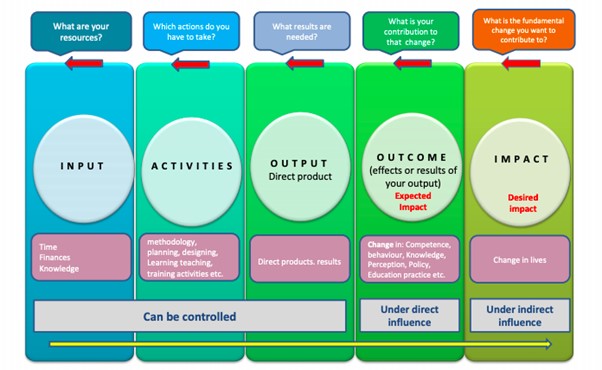
Project’s logical framework should be created starting from the impact and going towards the activities and input
What is the difference between outputs, outcomes, and impact?
- OUTPUTS – are immediate results achieved / products made soon after the completion an activity. Can be controlled by us
- Example: a mobile exhibition on climate change has toured through 90% of schools in Paris
- OUTCOMES – are results achieved after some time. These are the short-term effects of the immediate outputs. Under our direct influence, i.e. we expect them
- E.g.: at least 50% of Parisian students are aware of climate change impacts and has gained knowledge on how to adopt a climate-friendly lifestyle
- IMPACT – is the long-term results lasting after the project’s funding. Under indirect influence, i.e. we desire them
- E.g.: Parisian students reduce their impact on climate
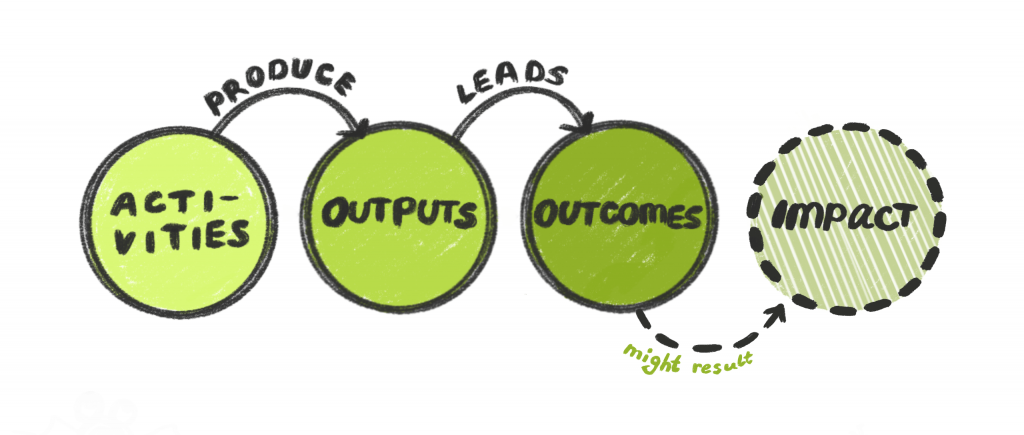
Another way to show activities produce outputs, which lead to outcomes, which may result in impact(s) in the long-term
4. Visualising the project proposal and the reason behind it
This may not come out as a complete surprise, but most of us prefer visual information to a written one (e.g. infographic vs. multi-page report). There is plenty of research and anecdotal evidence to prove that (so, you will have to take our word for it).
most of us prefer visual information to a written one
The same is evident for project design. And we are using the word design on purpose here. To unlock your best ideas for the activities and products you might need to draw your project plan (i.e. the logical framework). Because by visualising it you:
- can get a quick overview of the big picture
- have more space to think / you think more creatively, i.e. are not limited to words only
- get to a deeper layer, e.g. it may be easier to see links (or lack thereof) between your proposed activities, outputs, and the expected outcomes

4 benefits of visual thinking when planning projects
How to visualise the project plan?
The project proposal needs to have a beginning and an end. To put it differently, it could be imagined as a chain of linked-up activities and results. One leads to the other until you reach the impact – from A to Z. Hence, we would recommend visualising the project plan accordingly.
Proposal could be imagined as a chain of linked-up activities and results
To see how this works in practice, check out this example:

Sample project’s activities’ and results’ chain (from start to impact)
Note: if the project chain cannot be linked at some point, it means you need to update your plan. For instance, add additional activities, remove improbable results, etc.
Tools for proposal visualisation
There are plenty of ways to visualise your project. To name a few:
- Pen and paper – probably the easiest method; yet it is not made for online collaboration and certainly not for the times of social distancing. Thus, if you are willing to get feedback and ideas from others (not just your office colleagues), we would recommend other tools mentioned below
- Google Slides – not a very common choice for making a project plan. However, it does its job and allows for easy and effective online collaboration. The tool is free of charge and medium in difficulty
- MS PowerPoint – same as above. Yet, online collaboration will require all partakers to have OneDrive installed (it is Microsoft’s equivalent of Google’s Drive)
- Mindmeister – an easy-to-use tool that allows visualising your project’s concept, collaboration with others and a lot more. It is free for the basic package and paid for premium users (example below)
- MS Word – probably the least friendly tool to visualise a project, but it can be done (see an example below). Online collaboration requires all partakers to have OneDrive installed (like MS PowerPoint)

Excerpt from Mindmeister

Visual project plan made with MS Word
5. Getting feedback for your project plan
Having a visual project plan makes it a lot easier to ask for feedback from your colleagues, target groups and/or other relevant stakeholders (e.g. partners in the project). That is because they will:
- be able to see the overview / big picture right away
- have a better understanding of what is your proposed idea all about (remember, visual information beats the traditional kind)
Note that you would still need to explain the rationale of the project to them. This will not only get them on the same page, but will also give you a chance to see whether the proposal (as it is) makes sense. Tip: just like with drawing, verbal explaining can unlock yet another layer of understanding for you (i.e. once you make your idea vocal, you will see it differently).
verbal explaining can unlock yet another layer of understanding for you
How to present your project idea(s) to others?
Several world-class presenters (think TEDx) suggest using the below-mentioned order when presenting to others (for highest information intake). It is also known as the Golden Spiral:
- Who do you want to support/work with – who is the target group of your project
- Why do you want to do it – what is the problem and why is it relevant
- How will you do that – what is the proposed chain of activities-results, which will lead to your desired outcomes
- What do you want to do – what impact do you want to achieve in the long-term
- Where and when – lastly, get to the details and specifics

Golden Spiral of presenting things
Once you are done explaining, ask for feedback. However, we will not cover how to best do that (as our post is turning out somewhat longer than expected).
Usually, pitching your idea comes with perks:
- someone may suggest a perfect partner for your project
- someone would like to come onboard after falling in love with the idea
- pinpoint the things you have missed
- recommend you a thorough reading on the topic
- and more
Note: not all feedback will be right and certainly not all of it needs to be incorporated into your proposal.
6. Finalising the plan and starting proposal writing
The last step before project writing is to give your plan a time frame. For this, we recommend making the so-called GANTT chart (most are made using MS Excel or Google Sheets). In essence, it is a table, where the first column signifies your project’s activities, while the top row is for time units (e.g. project months). The cells in between are highlighted (or somehow marked) according to when a specific activity will happen in the project. Check out an example:
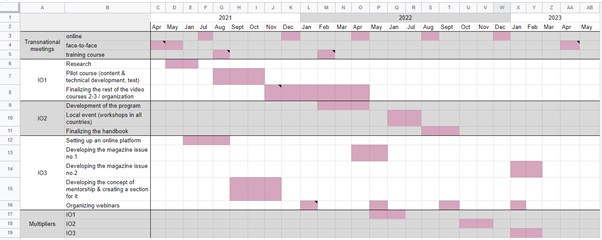
GANTT chart of a project
Why bother with GANTT chart?
Project’s time-frame may help to reveal:
- deffciencies in the project plan. E.g. some activity might not have enough time for it / too many activities at the same time, etc.
- extra capacity for additional acitivities/outputs
The end of the journey
Once you are happy with how your project’s time frame looks like, you should either:
- ask for some more feedback and make final revisions accordingly
- say congratulations to yourself because project planning journey is officially over
With all the things (you have made) at hand, your proposal writing will be much easier, faster and better. Simply rely on your incredible preparation. We are proud of you!
To summarise everything
Your proposal writing will become a much smoother and more rewarding experience if you commit to the 6-step preparation (see below). Of course, some things that work for us might not work for you. If so, adjust accordingly.
- Frame your project problem
- Learn & research about it (make sure it’s real)
- Lay a proper groundwork (logical framework) for your project
- Visualise the project plan
- Ask for feedback & make revisions
- Create a timeframe & finalise
At any point of this process, you can return to a previous step. Revising is never a waste of time.
Revising is never a waste of time
Enjoy & good luck!
Looking for advice for your project proposal?
✍️ Let us know, we will always provide a consultation at no cost. If needed we can help to write the project proposal as well. Learn more here.
🤝 Looking for strong partners for your project: the idea might be relevant to our organisation, so why not us? Check out our PIF (partner information file).
Need tips & tricks for actual project writing?
- The ultimate project writing guide – what to do before / during / after project writing
- Read another blog post of ours on 10 top tips for project writing or check out our online courses.
- 🤖 AI update: how ChatGPT can transform your writing process.
- Learn about 4 key things to consider when writing or implementing a project
Want to see a sample project proposal?
In another blog post we are analysing a sample of our own grant-winning project proposal. See what worked for us.